


New to fishkeeping? This planted aquarium is easy to set up, and is suitable for beginners who would like to grow live plants in their community tank.
For our set-up, the aquarium we chose was a Juwel Trigon 190 with dark wood cabinet. The tank is a bow front corner aquarium which, due to its shape, should be placed in the corner of the room.
We chose the Juwel tank as it can accommodate a number of different fish types and it comes with a built-in internal filter and heater. The built-in filter makes equipment choice less difficult and this particular filter (minus the carbon pad) we found to be good for planted aquaria.
The heater thermostat, which keeps the water at the right temperature for the fish, sits inside the filter and is fitted in a place where it will receive a good flow of water. The heater is set to 25°C/77°F.
We built the cabinet ourselves as it came flat packed, so make sure that you assemble it correctly as the tank will be heavy once filled. Our tank can be viewed from both sofas in the room it’s in and is in the opposite corner to the television, so the two won’t clash. The corner is particularly suitable as there aren’t any radiators nearby which might cause the temperature of the tank to fluctuate. The French windows are opposite the tank but it is still the most suitable corner, and if sunlight does hit the tank during daylight hours, we can simply pull one of the curtains across.

Set-up type
The brief was to set up a tropical community tank with plants. A community aquarium is the most popular type of set-up – it houses a mix of fish that are all of a peaceful nature and a similar size, and which will all live happily alongside one another.
We wanted to add some real plants which make the aquarium look much more natural and also make the fish feel more 'at home'. You can just add basic gravel, but if you want your plants to grow really well, rather than just survive, you really need to add a few extras to the basic set up. We started at the bottom:
One useful tool for growing plants is the undergravel heating cable. This low wattage cable (usually below 50W depending on size,) emits warmth which causes convection currents to move water very slowly through the gravel and with it, nutrients that can then be taken up by the plant roots. Heating cables don’t come with thermostats as they are generally not powerful enough to overheat the tank.
Not everyone uses heating cables but most successful planted aquariums do, and to fit one and then turn it off in the future is far less trouble than to not fit one and have to strip the tank in order to put one in.
Substrate is the aquatic world’s term for the gravel or sand that goes on the bottom of the tank. In this case plant growth was a factor and so we needed something to feed the plants, and something to anchor the plants. The fertiliser came in the form of Tetra Complete Substrate, which contains nutrients to aid plant growth. The 'anchor' was a 10cm/4” layer of Unipac Senegal grit. You need a deep layer so that the plants can send the roots down, and the grain size should be quite small to aid anchoring and to allow the roots to push their way through it.
Most substrates need to be rinsed in tap water to remove any dust which would cloud the tank water once filled.
Note that plant fertiliser substrates like the Tetra Complete Substrate should not be washed as all the nutrients and particles would be washed away – so only wash the sand or gravel that goes on top of the plant substrate.
Aquascaping
Aquascaping is the term used to describe underwater landscaping, and it is a chance to create your own unique underwater scene.
Aquascapes should not only look good but should be practical for maintenance and sympathetic to the needs of the fish. Most tropical fish like to be able to hide if they feel threatened, so a combination of rocks, wood and plants will provide shelter. The lava rock we used has been carved to create holes and has good architectural qualities. It is inert, meaning that it won’t leach anything into the water that could poison fish or alter water quality.
The wood used is also for aquatic use but it will still stain the water quite brown. Ordinarily the carbon in the filter would help to clear the water of tannins but it was removed to prevent it sucking up the plant food.
Only buy wood from aquatic shops as it will sink and is safe for use with fish. The rock goes in first, then the wood, then the plants.
Plants
Plants are a major design feature of this aquarium so we used species we knew would grow quickly and were easy to keep. Fast growing plant species suck up the nitrates and phosphates that cause algal growth, and the tall species provide a bit of shade beneath them as they stretch across the water surface. We obtained ours from a mail order plant company and ordered a selection for a 90cm/36” aquarium.
We didn’t use all the plants that were sent as we didn’t want it to be too heavily planted, and instead just picked those that suited our décor and caught our eye.

Finishing touches
Carbon dioxide (CO2) was used to aid plant growth along with liquid fertiliser to be added on a weekly basis and reflectors to increase the amount of light shining into the tank. It is a good idea to plug your lights into a timer so that there is a fixed amount of light per day. This offers a natural day/night cycle for the fish and plants and prevents the light from being left on too long – causing nuisance algae.
Tapwater was used for the set-up, in the hope that initial planting would remove the nitrate and phosphate. Three weeks on and the plant choice was proving successful as no algae had grown and water tests revealed that the tank was ready for its first fish.
Hardy fish were added initially – some Platies and Golden barbs – and again the water was tested following their introduction.
How to set up the aquarium

1. The Juwel Trigon corner tank with a capacity of 190 l./42 gal. is medium sized. The first thing to do is to stick on the 3D background with silicone. This should be done 24 hours before filling with water to allow the silicone to go off. The black Hagen internal background was cut to size with a hacksaw.

2. To get the best from the plants, a heating cable was used. The substrate layer was to be quite deep and the grains quite fine so it was decided that a cable would aid the plant roots by slowly moving nutrients through the bottom layers. This Dupla cable doesn’t come with suckers and was simply laid across the bottom surface area.

3. Tetra Complete Substrate was then added as directed. We used a 5.8 l. bucket which is aimed at aquaria up to 120 l./27 gal. We had more, but once in the tank it was decided that one bucket had provided a deep enough layer for the plants.

4. A new Unipac substrate was added to a form a layer about 10cm/4” thick over the substrate fertiliser and heating cable. The substrate is called Senegal and is made up of dark and light grains. It looks good, complements the dark colour of the tank and cabinet, and is a suitable particle size for anchoring plants. About 20kg was used in this tank.

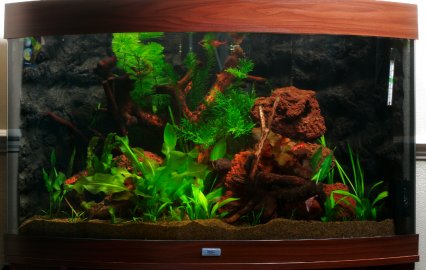
5. Next is the rockwork. We used carved lava rock to provide a solid structure in the tank and to accentuate the height and shape, and also complement the planting scheme. Seven pieces were used to create two pyramid shaped rock piles of different heights.

6. Bogwood was added on top of the lava rock, aimed at disguising the filter at the back, and again will make a solid design feature. We used three pieces from D-Pac and they look particularly root-like and attractive. The largest piece was put in the middle between the two rock piles and the other two smaller pieces placed either side at the front.

7. Half fill the tank for planting, which will enable the plants to stand up while you are putting them in place, giving a better perspective of how they will eventually look. To avoid disturbing the gravel I poured tapwater from a bucket into the empty Tetra substrate bucket. It worked well and the water stayed quite clear throughout.

8. We got plants for a 90cm/36” aquarium from Java mail order. They were all young specimens and some plant knowledge is needed to establish which will grow tallest and quickest. Vallisneria was planted around the sides and Hygrophila polysperma at the back in front of the filter along with some Egeria. In this tank, they’ll need regular pruning.

9. Next the specimen plants like the Echinodorus were planted in the middle and short plants were placed at the front. Some Echinodorus tennellus was placed right at the front in the hope that it will spread by runner right around the bowed front of the tank, giving a carpeted effect.

10. As well as lighting and fertilisation, plants need CO2 in the water. We used two of Hagen’s Nutrafin Natural Plant yeast based systems and stuck the diffusers onto the Juwel filter wall. This tank needs two CO2 units due to its volume. Treat tapwater with a dechlorinator to remove chlorine or chloramines, then add a filter maturation fluid to kickstart the filter.

11. A thermometer was placed in the aquarium to allow us to monitor the temperature. The heater was set at 25°C/77°F, about average for most tropical fish, and will enable temperature checking at a glance.

12. A Seachem Ammonia alert warns you if any ammonia becomes present in the water. Test water daily, adding extra bacteria if necessary. Don’t add any fish until ammonia and nitrite levels are both back at 0.
How to mature your filter
We always recommend that filters in new set ups are matured before any fish are added, using a commercial maturation agent such as Waterlife's BioMature, in conjunction with an ammonia and nitrite test kit.
Add the maturation agent as per the manufacturer's instructions and test your water daily for signs of ammonia and nitrite. You'll find that after a few days the ammonia reading will get very high, then as the bacteria that convert this toxin into nitrite build up, the ammonia level will begin to fall and the nitrite reading will rise.
Once the filter bacteria catch up converting nitrite to nitrate, you'll see the nitrite reading begin to fall. When both ammonia and nitrite levels have risen and fallen back to 0, you can begin to add a few fish. Patience pays dividends!
Shopping list
Tank and cabinet
Heater and filter
Heating cable
Plant substrate
Gravel
Rocks and wood
Live plants
Water conditioners and maturation agent
Thermometer
Test kits for ammonia and nitrite
Ammonia alert
CO2 unit
This is an item from the Practical Fishkeeping archives. It may not be reproduced without written permission.