Beautiful young angelfish don't stay that petite size for long. John Rundle warns of the problems faced by many fishkeepers when these popular tropical fish reach adulthood.
Beautiful young angelfish don't stay that petite size for long. John Rundle warns of the problems faced by many fishkeepers when these popular tropical fish reach adulthood.
I wish I had a pound for every time I’ve seen two large angelfish in a dealer’s tank and been told they’ve been brought in by a despairing customer!
Either these fish have become too large for a community tank set-up, or they are a pair, keep laying eggs and are attacking other smaller inmates.
These are common problems involving what must be one of the most majestic freshwater tropical fish in the hobby, and I often hear from readers with angels in community tanks who are having these problems when hoping to breed them in this scenario.
I don’t intend to look at genetics and methods on how to establish pure bred lines — and I use the word ‘pure’ with reservation. The odds will be that the pair in the community tank is a mixed pair: one could be a normal silver and the other pure black, or one gold and the other marbled.
These mixed crossings don’t prevent the production of healthy fish. Normally, any resulting youngsters will be of mixed colours. So here are some solutions to the problems associated with pairs of angels in a community tank.
The angelfish is a member of the cichlid family and the genus Pterophyllum. In this the most popular species is P. scalare. From the original coloured fish, with its silver body and dark transverse bands, numerous colour and fin shape varieties have been developed. The other species, such as Pterophyllum altum and P. leopoldi, when seen in shops, are usually wild fish and quite expensive compared to P. scalare.
Size of tank?
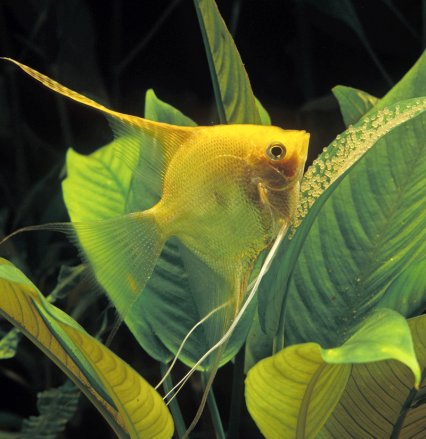
With its large disc-like body and extensive dorsal and anal fins, the angelfish can be more than 15cm/6” tall. So a fish bought when 5cm/2”, which is the size they are generally found in shops, soon grows and becomes that elegant adult.
These fish that started at 5cm in that 30cm/12” deep fish tank are then suddenly cramped for space. They are at their best in tanks at least 38cm/15” deep.
Some time ago my living room tank, measuring 127cm/50” x 46cm/18” x 30cm/12”, contained just eight adults and a few Corydoras catfish. It was one of the best set-ups I had kept in this tank and I regretted changing it.
The tank had tall plants to the rear, such as sword plants (Echinodorus spp. and Aponogeton bolvinianus) and Java fern (Microsorium pteropus). In front were species of lower growing Cryptocoryne. The angels would love to glide through the tall, background plants into a clear space at the front.
The temperature was set to 27ºC/80ºF and an internal power filter supplied the filtration. The water flow of the filter was set to low, because angels do not like to swim in fast conditions.
This generous size of tank and type of set-up would help alleviate the problem of having to move the angelfish on later.
Angelfish also prefer water that’s slightly acidic, 6.6 to 6.8 pH, and quite soft, although the many colour types we see will breed in surprisingly varying conditions. Water that’s hard and alkaline must be avoided though.

Feeding
The parents will benefit from a varied diet when in breeding form. Try a selection of quality dry foods, along with frozen bloodworm, and add a source of live food. I used live whiteworm fed once a week to keep them in the best possible condition.
The fry will take brineshrimp nauplii as a first food and will need it for up to three weeks. After this they will readiy accept any finely crushed flake foods provided as a healthy supplement.
Problems arising from angelfish breeding in general planted tanks can be tackled in two ways. Which ever one you choose, at least one extra tank will be required — because once a pair of angelfish has laid eggs in a tank with other fish, the problems can really start!
They include the possibility of the pair attacking the other inmates. If these are smaller fish they can be killed. Other tank residents could also eat the eggs and catfish may eat them at night.
Even if the parents can protect the eggs until they hatch, other inmates can pick off the tiny free-swimming fry. The parents then get continually frustrated trying to protect their eggs or fry and eat them.
In this community scenario the fishkeeper has two choices. If the pair decide to deposit their eggs on something that can be moved, such as a plant leaf or on a vertical side of a slate or stone, then my ‘method one’ has to be used.
If the pair decide at each spawning to deposit eggs on an area or immovable object, such as the sides of tank or even the heater/thermostat cable, then the keeper should use ‘method two’.
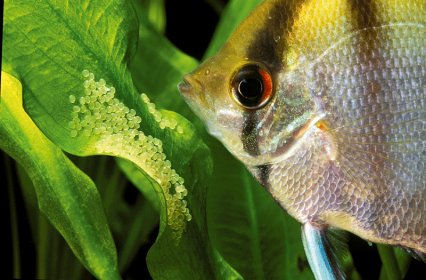
To help the pair decide where to spawn, offer them a choice of portable breeding sites, such as a piece of slate or flat stone set near vertical. Also offer plastic sword plants that have large leaves, or the leaves of real plants.
Method one
Once angelfish start a breeding cycle they can spawn regularly, creating the time needed to prepare the set-up.
Method one is based on removing the eggs and the portable breeding site, be it the leaf (real or plastic), slate or stone, to a separate tank.
The tank, which should be no less than 60 x 30 x 30cm/24 x 12 x 12”, is based on the bare tank set-up with no gravel substrate and contains only a heater/thermostat set to 27-28ºC/80-82ºF. A sponge-type filter should be fitted.
A clear glass container large enough to hold the eggs and portable egg site is now needed.
I use medium-sized sweet jars or small home-made tanks.
Now we’re ready for the angelfish to spawn again!
Once this has happened and spawning is complete, take some tank water and pour it into the jar or small tank. Now carefully take the eggs attached to whatever the portable breeding site was and, with the jar/tank held just under the water level, place the leaf, slate or stone into it.
Try to prevent the eggs leaving the water during this operation. If they are on a real plant leaf just remove that single leaf.
At this stage some breeders place methylene blue into the container to help prevent egg fungus. I have never found this necessary as if the eggs are fertile they will hatch without problems.
The container with eggs is now placed in the bare tank set-up — and make sure no tank water enters the container at this stage. Into the container place an open-ended air line that allows water movement to pass over the eggs. It must be set just right, for if too fierce it will blow any hatching larvae off the leaf or slate too soon. This movement replaces the parents’ fanning action.
Small water changes must be made regularly in the container and if any of the eggs are showing signs of fungus they can be carefully removed.
At the temperature suggested the eggs will hatch within 48 hours and for about six to seven days will be a wriggling mass of tiny heads and tails sticking to the leaf or slate. Some will drop off and fall to the bottom, but this will not normally stop their development.
During this time they are feeding off their yolk sac, so no other form of feeding is necessary.
On about the seventh day they should become free swimming, probably in the middle and upper areas of the container.
Now the moment of truth. Carefully take the container and slowly tilt it to allow all the fry to swim into the larger growing-on tank. Allow them to settle and feed them newly hatched brineshrimp, which they will eat in copious amounts. Broods could be quite large – up to 400 – but this will differ according to the size and age of the parents.

Method two
Angelfish will always tend to be independent and sometimes lay their eggs in places that won’t allow removal. These could be the glass sides of the tank, filter body or even heater/thermostat cable.
If this continually happens in our community tank scenario, use method two.
This bare tank set-up has the same basic heating and filtration units, with the addition of a choice of breeding sites for the pair to deposit their eggs. These could be avoided and they will still choose to use the sides of the tank.
The pair are removed and placed in their new home — and note the need for adequate depth of tank. Don’t use a 30cm/12” one for an adult pair, but one that’s 38cm/15” deep is ideal.
When the pair spawn for the first time in this set -up try to give them peace and quiet. Avoid sudden movements that will alarm and make them eat their eggs.
Given this type of set-up you may be lucky in that the parents tend the eggs and, when the brood is free swimming, will look after them until large enough to fend for themselves. A pair of angelfish looking after a large brood is one of the hobby’s most stunning sights.
You may have a pair that keeps eating the eggs or fry. If so, then if the eggs are laid on a leaf or slate remove it and revert to the container used in method one.
The eggs can then be hatched as in that method.
Go for quality
Growing on will depend on how many fish you have tank space to spare. Do not try and raise a large brood of fish in a 30cm/24” tank.
A few good fish – say 50 – are far better than 200 runts.
Want to breed your angelfish? More help's at hand
This is by no means a detailed article, more an offering of ideas on how to save some young from that lone pair of angelfish in the community tank. It also hopefully makes you aware of problems that can arise when buying two fish the size of 50p pieces but that will soon attain spans of 15cm/6”.
If you want to breed angels as a serious project and want to know more about them, write to me via the letters pages at PFK.
Angelfish - how times have changed: Check out John Rundle's article in which he travels over 80 years back in time to look at how early angels fared.