


George Farmer decides it's finally time to aquascape his first Dutch-style planted tank and discovers it's not as easy as it seems...
I’m a fan of the nature style of aquascaping and the use of wood and/or rocks to dominate the initial layout, followed by plants to enhance it.
Yet sometimes it’s good to step out of our comfort zone and attempt something quite different, like just using aquarium plants to create the impact.
Step forward Dutch aquascaping — a style rarely seen in Britain. This look is based on a more traditional and formal style of gardening, using neat rows and groups of plants to please the eye. Stem plants, varying in textures and colours, are mostly used to create the desired effects.
It’s hard to beat the visual impact of a mature and well-aquascaped Dutch planted tank, so I was particularly excited about this task.
Initial planning
The choice of appropriate plant species came first and I considered my set-up in terms of size, lighting, nutrient and CO2 dosing. My experience and research told me what would be suitable in terms of what I could physically grow.
I wouldn’t be limited by choice as I had four T5 lights, plus excellent filtration/circulation in combination with a decent substrate and comprehensive liquid fertilisation regime.
Much trickier was planning where to position the plants. What would look good next to one another? Would they contrast well? How big would they grow? How would their growth characteristics affect the aquascape in terms of aesthetics and maintenance?
Reading through the Tropica catalogue I looked and split candidates into categories of foreground, midground and background, with a sub-category of a colourful plant as a focal point. I decided on a combination of classic Dutch plants such as Lobelia cardinalis and Bacopa caroliniana in combination with some newer species such as Staurogyne repens, Pogostemon helferi and the new Pogostemon erectus.
For colour and focal point I chose Ludwigia glandulosa, with Cryptocoryne wendtii ‘brown’ adding interest to the left.
I sketched a plan to decide where to position each species. I ensured the red Ludwigia would be just off centre, in the midground, to help create the focal point. The Lobelia was to be across the foreground and into the midground to help achieve a 'street' effect for depth. This photo shows how the planting layout looked when the tank was viewed from above.

Growing pains
To minimise the risk of early algae I ran a photoperiod of seven hours using two T8 fluorescents for the first month. Without livestock I could dose more CO2 than usual.
The plants grew well, despite the lower lighting levels, but I soon realised that to get the aquascape looking good overall some clever pruning techniques would have to be employed. With some stem plants (Myriophyllum) growing at around 15cm/6” per week and others (Ludwigia) at 1cm/0.4” it would be challenging to get the plants pruned to all reach the desired heights and maturity simultaneously.
Then, as the plants matured and started to fill out into each other’s space, the lighting had to be increased to ensure enough was available to all of them.
Eventually I upgraded from two T8 fluorescents, to two T5s, then four T5s and increased CO2 and liquid fertiliser dosing accordingly. This brought more challenges, as the fast growing plants would grow even quicker and require more frequent pruning to prevent lower plants being light deprived.
I had to cut some stem plants at substrate level, prune to the desired height, then re-plant. I couldn’t simply uproot them and trim, because that would unleash particles of clay substrate into the water column, resulting in very cloudy water.

As I work away from home midweek, this task resulted in weekly maintenance sessions, each taking up to three hours, just to keep the tank looking its best. One benefit of increasing the lighting saw the Ludwigia soon going a brilliant deep red.
Dan Crawford, co-founder of the UK Aquatic Plant Society, had previously unsuccessfully attempted a Dutch aquascape in a 120 x 45 x 45cm/48 x 18 x 18” aquarium, using the latest growing techniques. He used EI fertilisation, lots of flow (5,000 lph via two massive external filters) and lots of light (four 54w T5), but the results were unmanageable.
I, however, resorted to some pretty old-fashioned growing methods. I went for lower light, lower circulation and less nutrients — and the results were to prove much steadier.
A tank dominated with stem plants is hard to maintain at the best of times, so use as little light as you can get away with, as this leads to less demands regarding CO2 and other nutrients, and more manageable growth. Algae is less likely in lower energy set-ups too.
Super growth is fine if you can maintain your tank several times a week, but many of us lead busy lives, so think carefully before investing in a high-energy planted tank system — especially with fast-growing plants.
Another traditional difference is the use of a ladder-type CO2 diffuser rather than a glass ceramic or inline type.
This is perfectly suited to the Dutch tank as you can instantly see how much gas you’re dosing, as it acts as a giant bubble counter. It can also be neatly hidden from immediate view behind a suitable background plant.
These diffusers don’t need cleaning as much as the glass ceramic disc types either and don’t block flow from external filters like inline diffusers and reactors.

The greenery and where it went...
Foreground:
- Lobelia cardinalis
- Pogostemon helferi
- Staurogyne repens
Midground:
- Cryptocoryne wendtii ‘brown’
- Ludwigia glandulosa
- Pogostemon erectus
- Echinodorus ‘Vesuvius’
Background:
- Vallisneria nana (later removed)
- Hygrophila difformis
- Myriophyllum mattogrossense
- Bacopa caroliniana
Prune with care for the best results
When you prune a stem plant two new shoots will usually grow from near the cut point, forming two new stems. Further pruning will result in the plant becoming very bushy, eventually looking too messy, and/or the lower parts will die off due to lack of light.
Simply prune off the newest shoots and re-plant, discarding unwanted and ugly plants.
Always dispose of aquatic plant cuttings carefully to prevent them entering waterways.
Maintenance timetable
Daily:
- Add liquid fertiliser (15ml Tropica Plant Nutrition+)
- Check tank temperature
- Check CO2 (two bubbles per second from ladder diffuser)
- Feed fish (three times)
- Remove floating leaves and unhealthy leaves.
Weekly:
- Clean aquarium glass
- Wave hand around plants and substrate (dislodging accumulated debris/detritus) followed immediately by 50% water change)
- Clean Fluval G6 mechanical pre-filter
- Prune and re-plant greenery as required.
Did you know?
The origins of the Dutch style came from the NBAT, the Dutch Society for Aquarists. Founded in 1930, it wrote articles on the hobby and at its peak had more than 24,000 members. Until 1956 it influenced thinking and the Dutch aquascaping style arrived
In that year the NBAT looked at determining the general guidelines on how a planted tank should look and what rules should be followed.
It continues to run an annual contest that encompasses many forms of the hobby, as well as what we know as Dutch aquascaping, with the judges visiting aquariums rather than relying on submitted photography.
The most demanding tank
There’s no wood or rock in a Dutch set-up — so plant choice and positioning are vital.
This is the most demanding planted tank I’ve kept, but one of the most rewarding. It would benefit from a few more months of growth and pruning to achieve the compact growth and definitive groups and lines expected of the style.

Cost at a glance
Aquarium: Custom-built 80 x 45 x 45cm/42 x 18 x 18”, 160 l/35 gal, 10mm/0.4” braceless, rimless Optiwhite glass (£350).
Lighting: Arcadia four 24w HO T5 overtank luminaire, ten-hour photoperiod once plants matured (£200).
Filter: £100 (or Fluval G6 £350)
Heater: (£20).
Substrate: Tropica Plant Substrate and Capsules, Unipac Maui Sand (£25).
CO2: Two kg Dennerle pressurised system with solenoid and ladder diffuser, (two bubbles per second) (£120).
Fertilisers: 15ml Tropica Plant Nutrition+ per day (£15).
Plants: From Tropica (£150).
Fish: Tiger barbs (£25).
Total: £1005
How to set up your Dutch-style aquascape
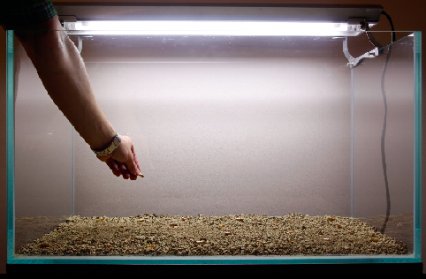
1. I used an 80 x 45 x 45cm/42 x 18 x 18” Optiwhite braceless rimless aquarium. I used a base layer of Tropica Plant Substrate and Capsules to provide the plant roots with nutrients. The clay-based substrate takes those nutrients from the water. The capsules are filled with nutrient-rich balls.

2. The base layer is topped with Unipac Maui Sand. This new product has a grain size of 1-3mm, allowing for easy planting and root penetration. I have sloped it slightly to the rear for a greater sense of depth. The sand will be covered by plants, ensuring it will not be overwhelmed by algae.

3. The sand is marked out by cut pieces of drinking straw. Prior to planting I created a positioning plan for each species. I considered plant size, colour and texture, anticipating how the plants will grow and appear once mature. I use a colander to fill with water to prevent sand clouding.

4. The tank is half-filled slowly with water. This enables me to plant without spraying, as would happen if planting into just a wet substrate. My water is hard, but I can grow most species if lighting and nutrient levels are appropriate. The sand is inert so doesn’t affect water chemistry.

5. The foreground is planted with a mix of classic and contemporary species. From the left there’s Lobelia cardinalis, Pogostemon helferi and Staurogyne repens. Lobelia creates ‘streets’ for depth. The same principle is applied to Staurogyne and planted to the midground, as is Lobelia.

6. From the left the midground is planted with Cryptocoryne wendtii ‘brown’, Ludwigia glandulosa with Pogostemon erectus in front. The brown of the crypts and deep red of Ludwigia will add a dash of colour among other plants. Only over the weeks do the colours become obvious.

7. From the left the background is planted with Vallisneria nana, Hygrophila difformis, Myriophyllum mattogrossense and Bacopa caroliniana. The vallis was so tall I cut it back. It didn’t recover, so I replaced it with more H. difformis. All these plants vary in textures, making for an interesting backdrop.

8. The tank is filled. I have used water at 25°C/77°F to help ensure the more delicate species don’t get shocked. Slow filling ensures the substrate does not cloud, especially if the base layer substrate is disturbed. Any floating leaves are netted and pieces of drinking straw removed.
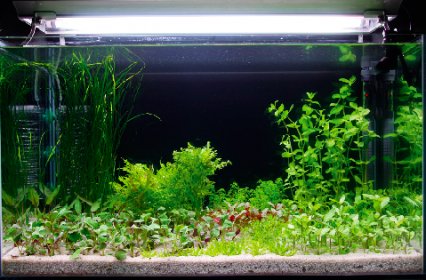
9. A black background is added for contrast. The Fluval G6 filter is fitted. It’s an ideal size, creating circulation without excess turbulence. A 200w heater and pressurised CO2 system with solenoid and ladder diffuser is fitted. The aquarium is fishlessly cycled prior to adding livestock.
Why not take out a subscription to Practical Fishkeeping magazine? See our latest subscription offer.