


George Farmer sets up an aquarium based on a freshwater-filled limestone sink hole from Central America in this step by step guide.
Type in ‘cenote photos’ on any Internet search engine and you see immediately what inspired me to set up this tank, which is loosely based on a cenote or sink hole in Yucatán, Mexico.
Underwater meadows of what look like Riccia with driftwood and roots protruding look amazing and the blue water, a result of high mineral content, adds to a real aquarium feel.
I felt in my element; an aquascape that almost looks like a contrived nature aquarium.
This tank is technically not a real biotope. I wanted to create a cenote-themed tank, but wasn’t able to track down the right fish. Instead, using artistic licence I settled on the Liberty molly, Poecilia cf. salvatoris. These are more common elsewhere in Central America, but related fish have been recorded from cenotes.
Chara is a common plant in this area, but it is not often seen in the hobby, so I used Riccia fluitans.
Natural habitat
The Yucatán Peninsula is a porous limestone shelf and all the freshwater rivers are underground.
Being porous, caverns and caves form where the fresh water collects — hence the cenotes or sink holes.
The water that gathers in these caverns is turquoise with a temperature of 26°C/79°F. The stalactites and stalagmites that form there are works of art.

Gateways to the underworld
The cenotes or sink holes are among the most impressive natural wonders of Yucatán. There are over 3,000, but only 1,400 have been studied and registered.
The local Mayan people had called them dzonots, which the conquering Spaniards translated as cenotes, meaning ‘deep things.’
These sink holes are beautiful and were once the only resource of fresh water in the jungle. For that reason, they were worshipped as the sacred places of the Maya and, for them, represented the entrance to the underworld.
There are four different types of cenote: completely underground, semi-underground, at land level like a lake or pond and open wells. Some are accessible for swimming and cave diving.
Designing a similar aquascape was relatively simple. I wanted a sand bed partially covered in Riccia with protruding driftwood. This is usually a floating plant, but it can be easily tied to flat stones or pieces of slates using fishing line.
Adequate lighting is required to grow plants, as is CO2.
To achieve the water’s blue tinge I simply used an actinic fluorescent tube to light the background. My water is already hard, making it suitable for the fish and I limited CO2 to ensure the pH does not drop below neutral.
Maintenance
Every week one third of the water is changed using de-chlorinated tapwater and every month the filter is cleaned in old tank water.
Every week the glass is cleaned with an algae magnet and the glass CO2 diffuser is cleaned in bleach and thoroughly rinsed afterwards.
The fish are fed on frozen Daphnia and brineshimp as well as a quality colour-enhancing flake.
The lights and CO2 are programmed on a timer.
Tank profile
Tank: 60 x 30 x 30cm/24 x 12 x 12”, 6mm thick regular float glass with clear silicon.
Filtration: External
Lighting: Two 18w T8 fluorescent tubes with reflectors
Substrate: Child’s play sand
Plants: Riccia fluitans
Fish: Liberty mollies.
Aquascape on a budget
Tank: £25 for a custom build from the manufacturer
Lighting: £40 for the two T8s
Filter: £15 (internal)
Heater: £15 (100w model)
Sand: £3
Wood: Free. Collect your own!
Plants: Free. Find a friend with Riccia.
Fish: £30
Total: £128

The fish
Common name: Liberty molly
Scientific name: Poecilia cf. salvatoris
Family: Poeciliidae
Origin: The true salvatoris is found in San Salvador, Honduras, Panama and Nicaragua. However, salvatoris-like species have also been collected in Mexican cenotes. These might be new salvatoris, but, due to their location, it seems more probable that they are other possibly undescribed Poecilia species.
Diet: Mix of quality dry and frozen
foods. The species typically takes flake
readily but is an active grazer and loves to browse on algae.
Size: Males up to 6cm/2.4”, females to 8cm/3.1”. Larger in the wild.
Breeding: Like other poeciliids this is a livebearer. It breeds readily although recorded occurrences are rare due to limited availability.
Notes: This is a relatively rare molly in the hobby. The male is more colourful with red finnage. In shops they take time to settle and show full colour. This fish is also known to be a jumper, so fit a hood!
Price: Up to £7 each.
How to set up your Cenote tank

1. Tank and substrate
I used a 60 x 30 x 30cm/24 x 12 x 12” (54 l/11.9 gal) aquarium ordered from the manufacturer and costing £25, being 6mm thick regular float glass with clear silicone. There are no braces or rims, making it ideal for overtank lighting. I have added a perspex cover to minimise evaporation.
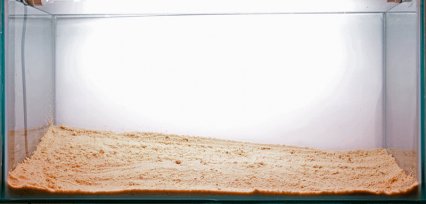
Some 5kg of play sand is added as it’s a suitable colour and texture. It is also inexpensive, non-toxic and does not need rinsing. It does not contain any nutrients, however, so isn’t ideal for rooted plant growth. This isn’t an issue as I am not using plants with a root structure.
2. Levelling off with gradients
The sand is levelled with a paintbrush, deeper to the left and rear of the aquarium to give a sense of depth. There will be an open area to the right so the layer is thinner. Sand can compact over time so it’s important to disturb it occasionally to prevent excess anaerobic bacteria.

3. Positioning the driftwood
Driftwood is collected from a nearby lake, cleaned and pre-soaked to ensure it is safe and sinks. The wood is positioned to look natural and aesthetically balanced. Later I notice the largest piece floats, so I position a rock to weigh it down until it settles of its own accord.

4. Placing the plants
I was given a large portion of Riccia fluitans which I separated into around 30 pieces, each measuring 3cm/1.2” square. Using fishing line I tied each piece on to a piece of slate measuring roughly the same size as the portions. They were then added around the sand and wood.

5. Keeping the greenery moist
A spray mister is used regularly to prevent the plants from drying out as if Riccia is left too long it can die off quite rapidly. The remaining Riccia stones are placed carefully around the sand, leaving open sand towards the front. Eventually the Riccia will grow in and fully cover the base.

6. Filling slowly with water
The aquarium is filled slowly to prevent the sand from floating into the Riccia. I use a colander to ensure the water spreads. I use my regular tapwater as it is hard and alkaline, so ideal for my fish. The water is also fairly high in nitrate and phosphate, but the Riccia will soak it up.

7. Final touches before fish
I use a large external filter but a small internal is fine. An internal heater is set to 26°C/79°F and a CO2 unit helps the Riccia. Lighting is by two 18w T8 fluorescent tubes with reflectors and the photoperiod is set to eight hours. Fishless cycling takes place before any introductions.
Check out some of our other step-by-step guides:
How to set up a Cambodia biotope aquarium
How to build a Great British aquascape
How to set up a White Cloud biotope
If you enjoyed this article, why not take out a subscription to Practical Fishkeeping magazine? Check out our latest subscription offer.