


George Farmer plucks up the courage to set up his first marine aquarium — and guess what? It's planted!
Why was I always too scared to set up a marine tank? Because to get them looking remotely attractive I assumed you would need to spend a lot of time and money on hi-tech equipment to grow those difficult corals.
I had seen a lot of tanks on various forums and thought 95% of them looked unsightly, with randomly-placed rocks and seemingly no real attempt at aquascaping — not to mention lots of ugly brown corals and algae-covered glass and equipment.
Then I heard about macro-algae, not only being used as a nutrient export in refugiums or algae scrubbers, but as attractive features.
The first marine tank I saw was PFK editor Jeremy Gay’s seahorse tank several years ago. So, fast-forward to the present day and I adopt a 125 l/27 gal aquarium and set up my first planted marine tank…

Setting up
Some gear supplied with the tank proved very useful. The T8 lighting consisted of two full-spectrum lamps with reflectors, ample for showing off the fish and other colours. To supplement this, and to give a great crisp white effect, I added two TMC AquaRay 500 Marine White LED strips.
Combined with plenty of surface movement, the glitter lines are very attractive and natural looking. The lighting intensity also stimulates fast macro-algae growth and therefore good nutrient export.
The LED strips were fitted to the tank’s hood flaps by drilling two holes and attaching small nuts and bolts using the light unit’s mounting brackets. Because the LED units willl run relatively cool there is no danger of overheating.
The supplied internal filter and heater were removed in favour of a large external filter and inline heater. The filter provides good circulation levels at 1,200 lph and only sponge media act as mechanical filtration.
The filter outlet is pointed slightly upwards to provide good levels of surface agitation, helping to maintain good oxygen exchange and driving off CO2. Because the macro-algae photosynthesises it produces oxygen during the photoperiod, but uses oxygen and produces CO2 at night.
It is therefore important to minimise CO2 and maintain high O2 levels to prevent pH swings that can harm fish and potentially allow the algae to go 'sexual' and crash.
Further circulation and flow were added using a 1,000 lph powerhead and later another 1,000 lph powerhead was fitted. The two powerheads were then fitted to a simple plug-in wavemaker to enhance circulation throughout the water column.
After much research I decided not to use a protein skimmer and felt that my large quantity of live rock, rampant macro-algae growth and good levels of circulation would be enough to maintain good water quality. I understand that not using a skimmer has the advantage of encouraging populations of various live foods.
Marvels of rock
I have read many times that one of the most important investments for a marine tank is live rock. I bought the best I could afford and have not been disappointed. The stuff is remarkable! I am used to rocks in freshwater tanks, but these are worlds apart.
The rock was already covered in deep purple coralline algae and various critters were spotted within hours of installation. I can spend many an evening staring at the rock, nose pressed to the glass, watching the tiny creatures go about their business. Small sponges, polyps and different macro-algae species seemingly appear from nowhere!
Crafting with rock
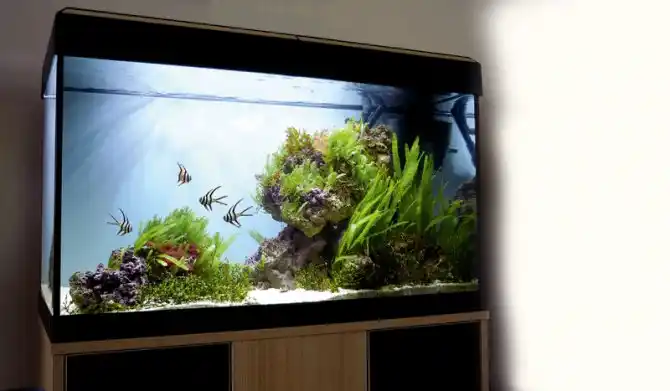
I decided to use two main piles of rocks: a large one placed on the right to help hide the equipment and a smaller mound on the left.
The whole design is a triangular composition with a pathway running between the mounds to help create a sense of depth.
Due to the position of the tank in my living room it can also be viewed from the left, adding a further dimension to the aquascaping as the bigger rocks are in the background.

Steps to take and prevent the crash
I have heard many horror stories about entire populations of macro-algae crashing. This happens when the algae goes from its usual asexual state to sexual and releases gametes into the water in a last-ditch effort in a fight for survival.
There are numerous triggers for this happening, including big changes in water chemistry and light.
For these reasons a lot of macro-algae, especially Caulerpa, is kept in refugiums which are kept lit 24 hours a day.
Another trigger is when the macro-algae is starved of nutrients — so it is important to limit the biomass by regularly pruning and removing quantities of macro-algae to help keep a steady nutrient uptake.
Alternatively, nutrient dosing can be used and some enthusiasts deliberately dose nitrates and phosphates into their macro-algae aquariums.
Tank profile
Tank: Fluval Roma 125, 125 l/27 gal.
Lighting: Two 20w T8 with reflectors and two TMC AquaRay 500 LEDs.
Filtration and circulation: 20 kg cured Fiji live rock, 1200 lph external filter, two 1,000 lph powerheads and wavemaker approximately 25 times turnover.
Substrate: Coral sand.
Livestock: Various macro-algae species, including Caulerpa taxifolia, four Bangaii cardinals and cleaner shrimp.
Water parameters: 25°C/77°F, SG 1.025, pH 8.1, NO3 <10ppm, PO4 <0.25ppm.
The fish and inverts

Common name: Banggai cardinalfish
Scientific name: Pterapogon kauderni
Origin: Bangaii Island, Indonesia
Diet: Zooplankton
Size: 8cm/3.5"
Breeding: Paternal mouthbrooder, easy to breed.
Notes: Banggai cardinals are striking fish, suitable for the reef aquarium. Mated pairs are the best way to keep them, or juveniles in small groups. Buy captive bred as they are at risk in the wild.
Cost: £20-30, depending on size.
These fish are fed three times a day on a variety of frozen foods and dried zooplankton.

Common name: Cleaner shrimp
Scientific name: Lysmata amboinensis
Origin: Indo pacific
Diet: Parasites in the wild, but any dry or frozen food in captivity.
Size: 5cm/2"
Breeding: Females carry eggs externally and release live young, though difficult to rear.
Notes: Cleaner shrimp are popular crowd pleasers due to their colouration and antics.
Cost: £15-20 depending on size.
How to set up your planted marine tank

1. Preparing tank lighting
My tank measures 80 x 35x 45cm/32 x 14 x 18” and holds 125 litres. It has two T8 fluorescent lamps and reflectors, creating a good spectrum for colours and growing plants. Two TMC Aquaray 500 Marine White LED strips are retrofitted.
I remove the supplied internal filter and heater in favour of external models.

2. Fitting the background
A blue background is fitted to the outside. I spray the back of the rear glass with soapy water, then fit the blue backing into position.
Using a credit card I smooth this sheeting down, ensuring no air bubbles are showing. Excess material is trimmed off, flush with the edges of the aquarium, using a scalpel.

3. Adding coral sand
A total of 12.5 kg of coral sand is added to the base. It is rinsed first to remove any excess dust. I am using a thin layer of sand for decoration — and to protect the base glass from the impact of the heavy rocks.
Coral sand helps to buffer the water and it looks very natural.

4. Installing equipment
I am using an external inline heater and 1,200 lph external filter with biological media removed to prevent nitrate build-up. Two sponges, acting as mechanical filters, are cleaned every week.
A phosphate remover helps prevent early algae problems and a 1,000 lph powerhead helps further circulate the water.

5. Positioning live rock
Some 20kg of cured live rock represents my most expensive outlay, However, it is the primary biological filtration and also contains a huge variety of interesting life forms.
There are seven pieces in total and they are aquascaped into two separate mounds, positioned to ensure each piece is stable.

6. Introducing pre-mix
Pre-mixed RO water and synthetic reef salt is added to the tank. I initially purchased some ready-mixed water, but also bought reef salt and an RO unit for future water changes.
The specific gravity is 1.025 at 25°C/77°F, tested using a refractometer, more expensive but more accurate than a hydrometer.

7. Setting the heater
Once all the water is added, the equipment is set to run. The filter is self-priming and the external inline heater set to 25°C/77°F.
Due to the low energy lighting and minimal equipment, overheating is not an issue — unless a very hot day. The aquarium has reached 28°C/82°F, which was acceptable.

8. Adding macro-algae
Several species of macro-algae and some Chaetomorpha are added. A couple of my species 'crashed' and were removed.
Fish are not added for five weeks. Although the live rock is cured, there’s a risk of ammonia spikes. Eventually four juvenile Banggai cardinals and a Cleaner shrimp are added.
This item first appeared in the January 2010 issue of Practical Fishkeeping magazine. It may not be reproduced without written permission.