


James Starr-Marshall shows you how to create an aquascape inspired by one of Britain's most outstanding coastal features in a step-by-step guide.
My aquascape designs have become increasingly influenced by Britain’s landscapes and I based my latest on Durdle Door, a naturally eroded arch in the cliffs at Lulworth Cove in Dorset .


In doing so I set myself some creative challenges…
I find this majestic feature awe inspiring, making it difficult to capture within the confines of my 16 l/3.5 gal tank. Then, in attempting to recreate a natural stone arch, I would inevitably end up with an artificial one as the focal point.
Stone arches are often grouped together with treasure chests and sunken shipwrecks, and widely considered inappropriate for an aquascape. I wanted to see if a stone arch within an aquarium could be tastefully achieved.
My constraints
To enable an effective transposition I felt a few key principles had to be kept in mind:
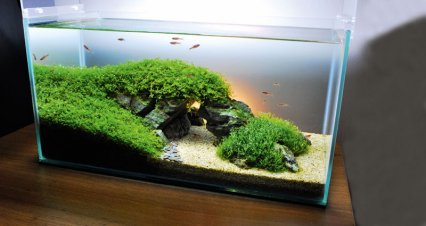
The size of the feature, when constructed in the aquarium would have to relate to the space around it. Some open water around the formation would be necessary to give the impression of the sky being a backdrop.
The rocks selected for the arch also had to fit together seamlessly, making a convincing looking single formation rather than becoming a jigsaw puzzle.
If the strata of the chosen rocks are carefully matched then this can, to some extent, be achieved. I thought this was more important than finding an exact match for the shape of Durdle Door.
Planting would of course require artistic licence, particularly in this case, as flora surrounding Durdle Door is quite sparse. I therefore decided to make adjustments.
To balance the scape I opted to plant around the foot of the pillar on the right hand side.
I also wanted the planting on the left to extend across the top of the arch to further hide the join between the two main stones and add strength and continuity.
Problem solving
I felt that with the correct care and attention the aquascape had real potential. However, I was concerned about algae as the plant mass was extremely low.
This can be problematic, especially in tiny aquariums where, without sufficient uptake of nutrients from the water column, algae can quickly take hold.
My fears were confirmed in week five of the project when, after pruning the H. callitrichoides, I noticed thread algae. Despite reducing the photoperiod and spot dosing liquid carbon it continued to thrive. Eventually the plants became swamped and I had to replant the tank.
I replaced the Vesicularia and Eleocharis with Riccia, a dense and fast growing plant that recovers quickly after pruning. The remaining and most important issues, however, were the growth and recovery rates of H. callitrichoides (HC).
To encourage the fastest growth possible I dosed nutrients with the Estimative Index method. I maintained a constant 30ppm of CO2 during the photoperiod and performed a 60% water change daily to improve stability.
The results were almost immediate, with the HC growing more than twice as fast as it had before!
Pruning the HC consisted of cutting only the runners when they reached a certain height. This way roughly ten of them were cut every day and most of the plant continued to grow at full force.
Some ten weeks after this second planting I was happy with a vibrant healthy aquascape. It was almost as I originally envisaged!
Cost at a glance
Tank: £16
Lighting: £30
External filter: £60
Pressurised CO2: £150
In-line CO2 diffuser: £15
Substrate: £15
Décor: £25
Plants: £25
Total: £336
How to set up your Durdle Door aquascape

1. The tank chosen was a 40 x 20 x 20cm/16 x 8 x 8” braceless. At 16 l/3.5 gal it’s at the smaller end of the nano category. The first stage of process was to mark out the intended line between the sand and planting substrate with card.

2. Some planting substrate was placed on the left of the card so the main stone could be seated and positioned. Sinking rocks into the substrate often adds to the sense of realism. To prevent tank damage don’t place large rocks directly on to the base.

3. Some fine adjustments were made to the position of the main stone and the remaining planting substrate was added to the rear left corner of the tank. I used a soft brush to shape the substrate convincingly around the foot of the rock.

4. Sand was added to the right of the card for cosmetic purposes. If you fill 0.5cm/0.2” higher on the sand side it will fall on to the planting substrate when the card is removed, not vice versa. Again a soft brush obtained the desired shape.

5. The card divider was removed carefully to prevent disturbing the substrate. A small rock was placed at the rear of the main stone to add a sense of depth and to prevent a landslide of substrate, as the slope was very steep there.

6. Two more small rocks were placed at the foot of the main stone. This was done to partially hide the rock face and provide a more natural transition between the sand and rocks. The soft brush was used again to smooth the substrate after placing the rocks.

7. The remaining rocks were placed, starting with the largest. At this point a couple of hours were spent making fine adjustments to the position of those rocks to ensure that continuity in their shapes and strata were maintained to ensure a realistic final effect.

8. I set individual HC with tweezers, planting heavily to avoid algae. To encourage it across the arch I tied some to lava rock and placed appropriately. Vesicularia ‘Christmas’ was similarly tied and placed on the right, along with Eleocharis parvula.
The final touches...
Setting up complete, I added the equipment and filled the tank very slowly in order to avoid disturbing the substrate. Throughout the planting process I had used a mister spray to keep the plants wet.
Making the best possible choice of livestock
As the tank was already mature from previous planting I added a cleaning crew straight away, in the form of ten tiny Cherry shrimps. Although not as efficient at algae eating as the Amano shrimp, they are more appropriate for smaller tanks.
Once the plants were fully established I decided to add fish.
Some enthusiasts would not advise it in a tank of this size, but there are small species available which I feel can be kept happy and healthy.
I chose some juvenile Boraras merah at about 1cm/0.4” in length which would have the equivalent swimming space of a 2cm/0.8” fish in an 80cm/32” tank. Combined with my good filtration and regular water changes I foresaw no problems with these additions.

Pheonix rasbora
Scientific name: Boraras merah.
Distribution: Southern Borneo.
Temperature: 24-26°C/75-79°F.
Diet: Powdered flake foods are readily accepted, as are frozen Daphnia. Feed fish this size sparingly two to three times a day.
Maximum size: 2cm/8”.
Notes: Female fish have a pronounced rounded stomach and tend to be slightly larger than males.

Cherry shrimp
Scientific name: Neocaridina heteropoda.
Distribution: South-East Asia.
Temperature: 18-28°C/65-80°F.
Diet: These will eat most things — from uneaten fish food
to certain algae.
Maximum size: 4cm/1.5”.
Notes: Females are larger and more intensely red than their male counterparts, which are quite often almost clear in colour.
Had I succeeded?
To answer my question as to whether a stone arch could be tastefully achieved within the field of aquascaping, I entered the tank in the AAC international aquascaping contest. It was placed sixth out of 88 entries in the small aquariums category, so I felt I had achieved my goal.
If you enjoyed this article, why not take out a subscription to Practical Fishkeeping magazine? Check out our latest subscription offer.