


Tired of seeing Anubias-based displays teeming with Kribensis, Nathan Hill takes a different slant on aquariums in the style of the Congo.
What is an African biotope aquarium?
Much like a regular biotope aquaria which is an aquarium that is set-up to simulate a natural habitat, an African biotope aquarium will feature fish, plants, water chemistry, and furnishings are similar to those that can be found in regions of Africa,
What conditions are needed for an African biotope?
When thinking about creating an African biotope, it's important to ensure correct compatibility and that you are able to provide the right conditions. Some plants may struggle to thrive due to the chemistry in the water, or species from a particular habitat are not always suitable tankmates. For example, larger fish may prey on smaller fish if they are their natural food in the wild.
Water quality for these fish should be soft and slightly acidic. The display featured on these pages here runs at a pH of 7.0, with a hardness of 8 – 10°KH. Temperature is fixed at around 25-26°C/77-79°F.
Ammonia and nitrite are nil, while nitrate runs at between 10 and 20ppm. After water changes of 30% weekly, a range of plant fertiliser is added. Easycarbo is used bi-daily at 5ml measures. No CO2 is used.
Setting up an African biotope in the UK - Congolese
It’s a brave aquarist who enters the depths of the democratic republic (DRC), braving hostile terrain to return with fish for the aquarium trade. As such, our hobby has potentially missed out on some beautiful tanks.
West and Central Africa have many rivers and within these river systems are numerous types of biotopes, and this particular set up will focus on species found in Congolese river waters.
To even mention an African aquarium is to think of the vast lakes, huge rocky habitats brimming with cichlids and synodontid catfish. African river fish have always been the ‘other’ option to the much more accessible selection of livestock coming from the Amazon. When embarking on this project – a loose biotope based on Congolese rivers – I hit a huge obstacle in the availability of the fish.
Related article: How to set up an Amazon biotope
I’d phoned as far afield as Yorkshire and Dorset seeking suitable African fish. After three days I’d all but given up. I could get a Kribensis here, a Congo tetra there, but nothing substantial. Faced with such a barren selection, I understood why West African tanks so rarely appeared on my radar…
I then called up old contacts at Neil Hardy Aquatica, a London-based importer and wholesaler of exotic fish. It’s one of very few places to have shippers on the ground in the Congo, but had what I needed – a good selection of Congolese livestock.
I wanted my display to be different. I wanted to use a handful of major players in the African fish scene, but at the same time keep things fresh. I had to decide early on whether to take the path of the fastest rivers, home to Steatocranus cichlids and Eutropiellus catfish, or something slower.
In the event I went for slower, if only for the extra options that gave me with planting. It was important for me not to mix the two worlds.
Biotopically speaking, keeping fast and slow fish together is as far removed as keeping Polar bears and Camels happy in one enclosure.
My next hurdle was suitable greenery and plant exporter Tropica came to my aid. As much as I enjoy Anubias, I felt they had been done to death. I wanted my set-up to be beyond the standard. I wanted to take a chunk of river where Anubias weren’t found.

I opted for a mixture of Crinums, half C. natans and the other half C, calamistratum. These large plants lend themselves well to the depth of the tank, creating immediate impact and density.

I also used Bolbitis, as I could tie these to the hardscape of the tank, giving instant greenery higher up. To fill a space I’d planned for the front I opted for delicate African lilies.
Crinums are easy to work with and needed minimal trimming before going in. These don’t like to be knocked or moved, so getting them placed correctly first time round is vital. Over the first week or two, a few leaves turned brown and dropped off —to be expected given their long-distance journey. They soon regained composure, however, and sent leaves spiraling upwards.
I felt it important that the hardscape should be realistically priced and easy to locate. Not all of us in the UK have time or geography to locate our own woods and rocks, so I opted for a selection of substrate and wood that can be purchased from most local retailers.

I used supplies from English-based company Unipac, feeling like the kid in the proverbial candy store as I took a once in a lifetime chance for a trolley dash in its ample warehouses.
I opted for the aptly named Senegal sand, a brown and black mix of fine grain, along with enough Sumatran wood to fuel a week- long bonfire. Some weathered petrified wood and cobbles followed, loaded onto a forklift truck that followed me while I leapt from selection to selection.
Unlike most home aquarists, time was not on my side for this project. I needed immediate impact, as I would only have the tank for a few months at best. In light of this restriction, but still wanting an active display, I deliberately stocked heavily.
West Africa has some beautiful fishes, many the domain of the committed breeder and intense cichlid buffs. I had to draw a line between being realistic on one hand and putting together one of those same, tired biotopes I’d seen produced many times before on the other.

I opted for a moderately narrow West African selection of fish. Originally I’d hoped for some Micralestes tetra, but lack of availability nudged me towards Brycinus sp. instead. These, along with some young Arnoldichthys spilopterus, provide much of the movement, and keep the upper layers of the tank filled.
Colour was introduced by the classic Congo tetra (Phenacogrammus interruptus) with an even split of males and females to minimise aggression.
Secretly, I’d planned much of the tank around my prime inhabitants — a brace of true Synodontis nigriventris. It was their presence that necessitated the dense, tank-long branch network, under which they cling and migrate around the display.
Although much of what is seen of them is silhouette, these are the real prizes in the set-up. Essentially, they are among the smallest species and I felt I could keep a shoal without having to find a dozen large homes for them after the project. Plus, I have a soft spot of upside-down catfish…

Despite my aversion to the easy option of Kribensis, I still craved a cichlid variety and when we spotted an unknown Hemichromis species at Neil Hardy’s, the deal was sealed.
Further investigation hints that these are actually H. cristatus, but the jury is out. Either way, these behaved exactly the way I thought they wouldn’t, roaming in all levels of the tank, being agreeable and peaceful, even with each other, and never shying away to breed.

To finish the surface layer I opted for the ever-stunning Butterfly fish (Pantodon buchholzi). Despite the tank being open topped, and despite their reputation for jumping, these fish have been unproblematic, nestling in the Bolbitis that hits the surface and shoving all other fish aside when food hits the top of tank.
A few weeks on and I’m happy with the result. Given the advantage of having already matured filters and media running on other set-ups, I was able to rush my tank, putting it all together in a few days. This isn’t something I’d suggest to the newcomer, or anyone without a massive contingency plan at the first sniff of ammonia, but I managed to carry it off without a hint of trouble.
Related article: How to set up a Neon tetra biotope
How to set up an African biotope
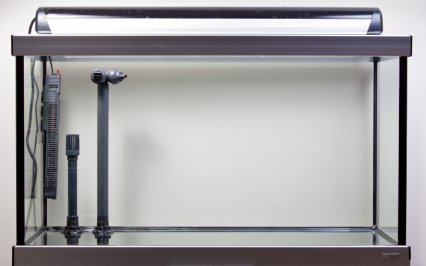
Step 1. The Fluval Studio tank is stripped and cleaned before use. Vinegar is used to remove any signs of a tidemark from previous use and the whole thing rinsed several times to ensure cleanliness. During this time the filter is attached to another, well-stocked tank.
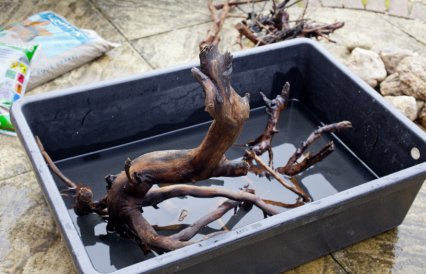
Step 2. Wood is soaked for the week prior to setting up the tank. This removes the worst of any tannic acids that can leach from it, as well as ensuring it will not float when placed into the aquarium. Water is changed daily on the wood during this stage.

Step 3. A layer of Nutribase is added and sculpted into shape in the areas where there will be heavy plant growth. This ensures that food will be available to the root-heavy Crinum when they are first put in to the tank. The Nutribase is not rinsed before use.

Step 4. Senegal sand is added on top of the Nutribase. To create the effect of the base of a stream, a dip is made at the centre while the two rear sides are more deeply banked. Once in place the sand is shaped and smoothed with a credit card.

Step 5. The first, gigantic piece of wood is added, serving as a template for the remaining pieces. The wood is so large that the cover glasses have to be removed and the light worked around it. The wood is seated deep into the sand to avoid toppling.

Step 6. With the centre wood in place, subordinate roots are added, creating a tangle for catfish at one end as well as a means for them to reach both ends. None of the wood is tied or secured, but placed so that movement is minimised.

Step 7. The first of the petrified wood rocks are added to one end of the tank, after being scrubbed with hot water. Rounded rocks are used to create a worn, riverine feel. Some are used to help reinforce the position of the wood, securing loose points.

Step 8. To offset the heavy hardscape at one end of the tank, more petrified wood is added to the other, along with cobbles. Once happy that the cobbles are in place, some water is added to the tank to allow for the first stages of planting.

Step 9. The plants are now sorted through, examined and removed from their pots, and have any excess root growth or damaged leaves taken off. The plants remain in their original polystyrene box when not being planted and are periodically sprayed with water.

Step 10. The Crinum are added, with C. natans being used at the cobbled end of the tank while C. calamistratum is used at the denser end to cut through the tangles of wood. The bulbs are not placed into the substrate and only the roots are buried.

Step 11. The Bolbitis is attached to higher parts of the wood with fishing lIne. Eventually the roots will grow onto the wood and secure the plants, but early on they need help to stay in place. Tying is loose to prevent damaging the plants.

Step 12. With all plants in place the tank is now filled and the filter reattached. Mechanical filters are checked frequently over the next few days, to take in account the debris and fine particles thrown up during the filling stage, and cleaned as needed.
Who helped with the project?
Everything involved with this project can be found with a little shopping around — the most difficult being the fish.
The tank is a Fluval Studio 900 from Hagen. It has a Fluval 306 canister filter, as well as the standard two T5 light tubes – one Power-GLO, one Life-GLO
The décor and sand is from Unipac Ltd., and the company’s products can be found in many Maidenhead Aquatic and other stores through the UK.
Tropica is a Danish wholesaler and its plants are available from many branches of Pets at Home, as well as a huge range of other retailers throughout the country.
Neil Hardy Aquatica is a wholesaler supplying many stores in the UK. However, note that it is a trade-only dealer and will not supply hobbyists directly.
Practical Fishkeeping thanks all suppliers who made this set-up possible.
For more advise and tips for tank set ups, species guides and fishkeeping information, why not subscribe to our monthly Practical Fishkeeping magazine? Visit our subscriptions page for the latest discounts and offers on print and digital editions.