


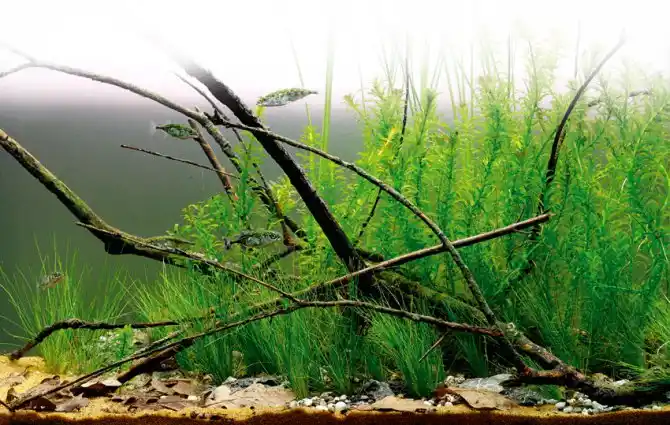
George Farmer creates the kind of traditional homeland lake biotope he had always promised himself!
Unique to the other biotope tanks I have created, I researched this set-up first hand by visiting a local lake in Cambridgeshire — and what an experience it proved to be!
My daily commute to work includes passing a large lake that was once a brick quarry. From the road you see protruding pieces of driftwood and dense thickets of marginal plants, but on closer inspection in the summer there are submerged meadows of Egeria canadensis, Ceratophyllum demersum and carpets of Eleocharis.
It’s very exciting for an aquatic plant enthusiast to experience this on your doorstep and, as a qualified sub-aqua diver, I took to the lake one summer’s day with a friend.

The water was clear and surprisingly warm. I saw huge shoals of juvenile roach and some impressive perch. The aquatic plant life was amazing too, even Aponogeton growing emerse on the muddy banks.
Most plants were growing completely submerged in warm and rather smelly soft mud-type substrate, with the occasional area of open sand.
Rocks and gravels were abundant too, presumably left over from the manufacture of bricks.
I couldn’t wait to replicate what I saw in an aquarium, so began creating my first planted tank biotope based on a UK lake.
Water chemistry
The lake water tested at pH 6.8, KH 6 and GH 18. This high general hardness was not surprising, due to the large quantity of leftover rubble. The relatively low pH in the absence of CO2 injection was a surprise however, and I put that down to the rotting and foul-smelling substrate,
as a result of hydrogen sulphide production.
Choosing fish and plants
I saw European perch (Perca fluviatilis) and Common roach (Rutilus rutilus) and they can potentially reach well over 30cm/12”, making them unsuitable for my 63 l/13.9 gal aquarium.
A commonly available alternative, and likely inhabitant of the lake, is the Three-spined stickleback (Gasterosteus aculeatus aculeatus). Having a maximum size of some 10cm/4”, a group of five would be ideal for my tank.
Suitable plants were also easy to find and I bought a few bunches of Egeria densa, pots of Eleocharis acicularis and a small bulrush-type potted pond plant labelled as native to the UK.
Biotope on a budget
I have used some high-end equipment on this set-up but it can be replicated at a fraction of my cost. Here’s how much you can expect to pay if restricted by a tight budget.
Aquarium and lighting: £80
Internal filter: £20
Substrate (sand and soil): £20
Décor: £5
Plants: £15
Fish: £10
No heater required.
Total: £150
How to set up your lake tank

Choosing the tank
I have used a 60 x 30 x 36cm/ 24 x 12 x 14” 63 l/14 gal OptiWhite glass aquarium, but you don’t have to use this glass as it is more expensive than float glass. The braceless and rimless style makes it ideal for overtank lighting. However, any aquarium with similar dimensions will be fine.

Separating substrate
Because I have used two substrates — sand and granular soil — I need to separate them. For this some card is fixed into place with sticky tape to create the required profile. The sand will remain as an open space with little planting and the soil will be planted heavily.

Adding silica sand
Silica sand is added in front of the separator card to a depth of around 2cm/0.8”. I only work to a shallow depth to help prevent any anaerobic bacteria build-up due to the sand compacting. This sand replicates nicely the look and texture of the sand seen in the lake.

Sloping the soil
Specialist granular soil substrate is added behind the separator card. I have sloped the soil towards the rear of the tank to help create a real sense of depth and to help the plants become better rooted. The soil is very rich in nutrients and will help feed the plants.

Brushing out a profile
The card is then carefully removed to reveal the two substrates lying side by side. I use a paintbrush to smooth out the soil into the required slope and profile, and care has to be taken to prevent grains of soil falling on to the sand.

Positioning the branches
Branches taken from the bottom of the lake are added and they remain submerged after adding water. Some branches allowed to protrude from the surface add further interest if you have an open-top aquarium.

Partially burying small rocks
Small rocks are then added to the sand and soil border. They have been partially buried to help stop the soil and sand mixing. A small amount of gravel is next added around the rocks to create a particularly natural look.

Boiling and adding oak leaves
Some oak leaves are added to the sand and rock area. However they are boiled first in water to ensure that they sink. The sand, rocks, gravel and leaves all help to create the look I saw when snorkeling in the lake.

Placing the plants
The aquarium is partially filled with water. It’s cloudly because the granular soil releases particles when I insert the plants. The bulrush type is at the rear, Egeria to the midground and Eleocharis around the rocks.

Fitting the filter
Remaining water is added and large external filter with glass inlet and outlet fitted. No heater is needed as the lake temperature was 19°C/ 66°F. Lighting is 1 x T5 or 2 x T8 tubes with reflectors, on a nine-hour photoperiod.

Typical fish for this biotope
Common name: Three-spined stickleback.
Scientific name: Gasterosteus aculeatus aculeatus.
Distribution: Widespread and found in most northern temperate regions, freshwater, brackish and marine.
Temperature: 4-20°C/39-68°F.
Diet: Worms, crustaceans, larvae, drowned insects, small fish.
Maximum size: 6-11cm/2.4-4.3”
Breeding: Usually between late March and early August. During these months there’s plenty of food for juveniles. In early spring the male’s throat and belly become bright orange-red, eyes turn bright blue and silvery scales appear on his back. These colours warn off the other males and attract females.
The male also builds a mound-shaped nest in a hollow on the substrate, using plant matter bound by sticky threads ejected from his kidneys. He uses his mouth to glue the bits of plants together.
Females lay eggs in the nest and the male fertilises them. He guards the eggs, fighting off possible predators, until they hatch, which may take from one week to a month.
The eggs need plenty of oxygen to develop, so the male wafts waves of oxygen-filled water over them with his fins. About 100 young leave the nest and dad continues to look after them for another week or more until they leave for an independent life.
Non-native and invasive plant species
Egeria densa, E. canadensis and E. nuttallii are non-native and invasive species to the UK and should be disposed of very carefully to prevent them entering our waterways.
Any dense growth of these weeds in slow-flowing rivers, drainage channels and canals can impede flow and exacerbate flooding. They can replace native aquatic plant species, reduce biodiversity in lakes and ponds, and interfere with angling and boating.
This article first appeared in the November 2009 issue of Practical Fishkeeping. It may not be reproduced without written permission.