


George Farmer's brief was simple. Set up the best Amano-style planted aquascape you can — in just one day! Here's how he did it.
When PFK’s Deputy Editor Jeremy Gay said he wanted the 'ultimate planted tank' for a step-by-step feature, I knew it would take something special to satisfy both of us.
The UK planted aquarium and aquascaping scene is enjoying huge popularity and some creations are impressive to say the least. Check out the new PFK Great Planted Tank series for ideas.
Unfortunately this makes my job, as this magazine’s planted aquascaping expert, even harder in maintaining the ever-high standards expected of me. It certainly keeps me on my toes!
Best equipment
I decided that, to do justice to the aquascape, I would need the best equipment possible. I wanted to emulate the ultra-modern ADA style by using a full opti-white glass, braceless and rimless tank with full glass CO2 and filterware with overtank lighting. The cabinet was chosen to reflect the minimalist look of the aquarium and the finish matched the light unit perfectly.
I considered using a 90 x 45 x 45 cm/35 x 18 x 18” aquarium, but decided it would be a too big a task to aquascape effectively in one day. Creating a mature look would be almost impossible. A German 60 x 30 x 35cm/24 x 12 x 14” opti-white glass tank with a total volume of 63 l/14 gal was used instead.
Opti-white is different to regular aquarium glass in that it is of higher clarity due to a lower iron content. This is particularly noticeable when viewing the glass cross-section that is normally green with common glass. With opti-white it is a light blue.
The aquarium’s glass thickness was only 5mm, so clarity difference was negligible — but I can see it making a significant difference with thicker glass required for larger tanks that are also braceless and rimless. One area where this aquarium is superior to all others I have seen is in its silicone work: It’s almost invisible and extremely neat.
The cabinet, also German, was very well made, pre-assembled, with a high quality look and feel.
There is a pre-drilled large hole in the rear for such as electrical cables, but I decided to carefully drill more holes in the sides to allow access to the filter and CO2 hoses. This prevents any ugly hoses and cables spoiling the clear background — another feature of ADA-style aquariums.
Backgrounds aren’t generally used. Instead a pale wall or plain wallpaper would provide a nice contrast to plants and fish. Backlighting can also be used to create interesting photography effects, as many may have noticed in some recent aquascapes from Amano and other enthusiasts.
Uniform heat
Filtration was by an Aqua El Max 250 external canister filter with a flow rating of 650 lph — an ideal turnover for this size of aquarium. A Hydor ETH 200 external inline heater was used to heat the water to 25oC/77oF. I prefer these to the regular internal heaterstats as they heat more uniformly and don’t look ugly sitting in the tank.
Cal-Aqua glass lily pipe filter inlet and outlets were used instead of the supplied plastic spraybar. The glass looks subtle and adds class to the whole set-up, and PFK Editor Karen Youngs was particularly impressed by the design.
Clear filter hose was also used to enhance the minimalist feel.
Lighting was supplied by the Arcadia overtank luminaire; a 60cm/24” 4 x 24W HO T5 unit with
Arcadia Plant Pro tubes. This is very high lighting, enough to grow any plant with ease. There are two separate plugs for two tubes each, allowing independent switching or timer-controlled staggered lighting.
I also like these units because they can be tilted in situ, allowing easy access to the water and glass for maintenance.

Clean look
Overall, the overtank design suits the clean appearance of the whole set-up and the units can also be suspended by using Arcadia’s suspension kit.
With this quantity of light, pressurised CO2 injection and regular liquid fertilisation is essential, otherwise algae would quickly take hold. A D&D CO2 system with 600g disposable bottle and built-in solenoid was used with glass non-return valve, glass bubble counter and glass diffuser.
Liquid fertilisers, ADA Green Brighty Step 1 and Ferka Balance-K are added daily, according to instructions. Dosages can be increased if the plants display signs of nutrient deficiency.
A permanent CO2 glass dropper/tester sits inside the aquarium to indicate gas levels present. It turns blue with too little, green with correct and yellow with too much. It is filled with 4KH water to achieve this colour reference with green indicating 30ppm CO2.
My substrate choice was easy, going for the reputable ADA system consisting of ADA Power Sand Special and ADA Aqua Soil Amazonia. These are incredibly rich in nutrients and many professional aquascapers swear by them. They are designed to be used in conjunction with the ADA Green Brighty Series range of liquid fertilisers, but the substrates are great when also used with other fertilisers.
Unlike most step-by-steps this aquascape will remain intact with minimal changes for the next few months. I will maintain it and report back with pictures to show how it has grown in.
The whole set-up is relatively expensive, but I believe it is worth the outlay if wanting to take the next step from regular off-the-shelf set-ups. The whole minimalist concept will suit some more modern homes or offices and I think this style of planted tank is a viable alternative to the reef.
It offers colour and interest, but at a faster pace. One can achieve a fully-grown aquascape in a couple of months using the equipment and techniques outlined here.
The set-up
Tank: High clarity opti-white 60 x 30 x 35cm/24 x 12 x 14” (63 l/14 gal), bespoke cabinet
Lighting: Arcadia overtank luminaire; 4 x 24W HO T5 Plant Pro tubes, 8 hours
Filter: Aqua El external 650lph, glassware
CO2: D&D pressurised system, glassware
Substrate: ADA Power Sand Special (S) and Aqua Soil Amazonia (43 l/9.5 gal)
Fertilisers: ADA Green Brighty Step 1 and Ferka Balance-K daily
Hardscape: Midori Wood, Mini Landscape Rock
Plants: Glossostigma elatinoides, Pogostemon helferi, Anubias barteri var. “Nana”, Cryptocoryne wendtii ‘Green’, Microsorium pteropus, Blyxa japonica, Alternanthera roseafolia
Fish: Black neon tetra, Hyphessobrycon herbertaxelrodi.
Thanks…
Thanks to Aqua Essentials for donating the following products:
German high clarity opti-white glass aquarium 60x30x35cm*; German bespoke cabinet – Manhattan finish 60x30x70cm*;
JBL AquaPad 60x30cm; Aqua El Max 250 external filter; Clear filter hose; Hydor ETH 200 external heater; Cal Aqua filter lily pipe glassware, inlet and outlet*; D&D pressurised CO2 kit; Clear CO2 hose*; Glass bubble counter, non-return valve and diffuser*; ADA Green Brighty Step 1 liquid fertiliser*; Ferka Balance-K liquid fertiliser*; ADA Aqua Soil Amazonia (9 l/2 gal)*; ADA Power Sand Special (S)*; Midori Wood* and Mini Landscape Rock;
* indicates products unique to Aqua Essentials.
Thanks also to Dan Crawford (UKAPS) for his assistance when aquascaping this tank — and to Arcadia for supplying the lighting.
The tank set-up

Tank and cabinet. The clean-cut look is designed to ensure minimal distraction from the aquascape when complete. The hole in the side is for filter hoses. The cabinet’s colour was chosen to match the Arcadia overtank luminaire.

ADA Aqua Soil Amazonia is added on top of the ADA Power Sand. It is sloped toward the rear to add an illusion of depth, being 3cm/1.2” at front to 10cm/4” at rear. Aqua Soil lowers pH/KH and keeps it stable, making it ideal for sensitive soft water fish, as well as supplying nutrients. The Power Sand and Aqua Soil are pre-soaked to allow easy planting.

Several small mini-landscape rocks are added around the Midori wood to enhance the natural appearance of the aquascape. Nooks and crannies are ideal for attaching plants at a later stage, such as Java fern and Anubias.

Glossostigma plantlets are inserted into foreground areas. Each one is individually pruned and inserted using aquascaping tweezers. Glosso is a classic foreground carpeting plant that requires high lighting, good CO2 and other nutrients. A full carpet can be achieved in as little as three weeks with strong lighting and good nutrients.

Pogostemon helferi is planted into remaining foreground areas. It is a beautiful and undemanding slow growing, low plant. Small Anubias barteri var. “Nana” plants are added in between some rocks. These will cover the rocks. Some Cryptocoryne wendtii ‘Green’ is added to the midground behind the glosso.

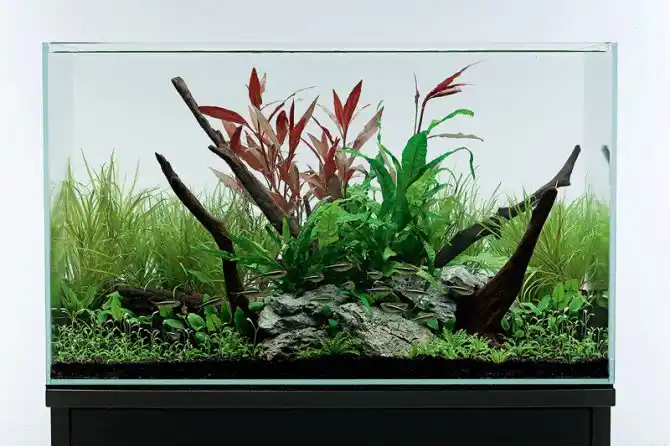
The background plants are added; Blyxa japonica along the back and sides with bright red Alternanthera roseafolia positioned just off-centre to act as a focal point. The Alternanthera will fill out and require regular pruning to keep in shape. Growth will become more compact and brighter red under the intense lighting.

Microsorum pteropus (Java fern) plants are inserted in between rocks. It is important not to bury the rhizome into the substrate. Eventually the plant will attach itself to the rocks. After a couple of months the fern will need pruning to prevent it from dominating the aquascape too much. Ugly leaves should be pruned off regularly.

All equipment set up. Filter gear added, including glass lily pipes, on left: CO2 equipment set up, including gas tester, on right. Filter outlet/inlet and CO2 diffuser should be positioned to achieve efficient CO2 microbubble distribution.

Water added slowly to prevent clouding and dechlorinator added. Filter and CO2 set to run. Bubble rate set to one per second and adjusted according to achieve green colour in CO2 tester.
Temperature set to 25C/77F. First dose of liquid fertiliser added. The tank was left to run for a week to allow new plant growth and safe addition of fish.

One week’s growth after daily fertiliser dosing, CO2 and lighting set on timers for eight hours. The Glosso had leggy growth due to too short a photoperiod. There was no visible algae and all the plants have significant growth.

20 Black neon tetras added in bag to acclimatise to temperature. These were chosen due to their simple colouring balancing with the bright colouring of the planting. Rapid plant growth ensures that ammonia/ammonium is never an issue, even with an immature filter. But always fishless cycle.

Fish swimming happily! Equipment removed temporarily for photography purposes. The fish complement the aquascape well and the whole layout works together with a nice range of textures and colour in balance. Longer-term maintenance will include daily fish and plant feeding, weekly 50% water changes and plant pruning.

Tip
Planting is done into wet substrate, but with no water in the aquarium. It is essential to keep plants moist by regularly using a water mister.
Check out some of our other step-by-step guides:
How to set up a Cambodia biotope aquarium
How to build a Great British aquascape
How to set up a White Cloud biotope
This article was first published in the May 2008 issue of Practical Fishkeeping magazine. It may not be reproduced without written permission.